

Grip tape provides a non-slip surface on a scooter deck. It is needed to help keep your feet from sliding off, especially on a stunt and or trick scooter where riders are jumping on and off their scooters. From time to time, you will need to change the grip tape on a scooter deck, here I tell you how to put grip tape on a scooter.
- Cut grip tape to the size you need – plus 1/4″ to 1/2″ more.
- Lay it on an ungripped deck with the backing paper still on.
- Peel the backing paper about an inch and line up the front edge against the headtube or beyond.
- Secure front, then slowly remove the remaining paper as you press the grip tape to the deck.
- Rub edges with a screwdriver.
- Trim with a razor blade, finished.
Grip tape is a big piece of sandpaper with adhesive on the back. It comes in fun styles and colors to add a custom touch to any scooter. This is another way you can customize your scooter by knowing how to put grip tape on your scooter. But first, you have to remove the old grip tape if your deck has grip tape on it.
How To Remove Grip Tape From The Scooter Deck?
To begin, if you acquired or have a scooter with grip tape already on it, and you want different grip tape, the old grip tape has to come off before putting new grip tape on. Sometimes grip tape will come off easily and sometimes not so easily. I will tell you how to remove grip tape and some tips on how to remove hard-to-remove grip tape.
To get started, set up your workstation by gathering the supplies needed.
Supplies needed…
- Work bench or table
- Allen wrenches (2 x 5mm) for removing the wheel
- Allen wrench (3mm) for removing brake
- Razor Blade tool, pocket knife, or any other sharp flat blade
If you are just starting in the world of scootering, here are some beginner tools to start your collection. These are the tools you will need to remove the wheels, brake, and grip tape. Keep in mind though, you need two 5mm Allen wrenches to remove the wheels. So you might want to invest in an individual 5mm Allen wrench too. I talk about what’s the best tool kits for beginners here.
Removing Grip Tape From Scooter Deck
- Take a razor blade, pocket knife, or some type of sharp straight edge and lift up a corner of the grip tape that is on the board.
- With your hands, pull up on the lifted corner and peel the old grip tape up slowly until it is completely off the scooter deck. It may take a bit of muscle to pull it off. It can stick really well.
- Tip 1: If you keep the paper as parallel to the board as you can when peeling it off, it will come off easier and more in one piece, versus pulling it in an upward position.
- Tip 2: If you find it difficult to pull the grip tape from the starting point, try using a pair of pliers to hold on to it to get it started. Then once you get quite a bit pulled up you can then take over with your hands.
It is that simple if you are lucky! If not, here is how you can get grip tape off that is more stubborn.
How To Get Stuck On Grip Tape Off
Sometimes grip tape will not come off easily as described above. So additional measures have to take place to remove the grip tape.
Heating the grip tape
One additional measure would be to heat the gripe tape. You can accomplish this with a hairdryer or a heat gun. If you do not have either of these and you have a hot sunny day, try setting your scooter out in the direct sunlight until it heats up a bit. This just might do the trick.
To begin, pull a corner of the grip tape up with the razor blade or other tool you have chosen to do the job. Then start to heat the grip tape by putting the airflow of the hairdryer or heat gun about 2 inches off the scooter deck and move back and forth as you do this. Try and quickly heat the whole deck surface then start to pull while warm.
If you have attempted to pull the grip tape off and it is starting to rip and not coming off in one piece then you can try heating it again. This will further heat the glue that has cooled and make it less tacky and easier to lift off the scooter deck.
If you need additional help in getting grip tape off that is stuck on, in addition to heating you can scape it off too.
Scraping the grip tape off
You can use a plastic scraper to assist in lifting the grip tape as you pull it, after heating it. If this alone is not getting it, you can try a metal paint scraper. Sometimes a square end of a metal file will help. You just need something to assist in scrapping the old grip tape off. Scape and pull it until it is all off the deck. Discard the old grip in the trash. Don’t litter!
Now that you have successfully removed the old grip tape, it is on to applying the new grip tape. Hopefully, you have chosen the grip tape you want to apply to your scooter and you are ready to get started with this step.
Grip tape comes in different size sheets, larger sheets are usually used for skateboards but can also be used for scooter decks. Smaller size sheets are meant for scooter decks. Then there is grip tape that is made for other applications such as stairs, ramps, etc. to keep feet from slipping on surfaces. You can find other grip tapes at a local hardware store or big box store. These kinds of grip tapes can be used in a pinch or as a budget option.
Now you are ready to begin the process of applying the new grip tape to your scooter. Here are the steps needed to do that.
How Do You Put Grip Tape On A Stunt Scooter: The Pro Way
To get the best results, it is best to remove the back wheel and take the brake off the scooter deck. What you will need, to do this is Allen Wrenches, usually two 5mm Allen Wrenches for the wheel and one 3mm for the brake.
- Disassemble the rear wheel and brake
- You will need two 5mm Allen wrenches to remove the back wheel.
- Hold one wrench in one bolt of the wheel and on the other side use the other wrench to unscrew the other bolt.
- Make sure not to lose the two spacers that will fall when you remove the wheel. Put them in a cup or lid of some sort.
- You will need a 3mm Allen wrench to remove the brake
- Loosen the bolt holding the brake on the deck, remove the brake. Set aside. Again place the screws somewhere that they won’t get lost.
- You will need two 5mm Allen wrenches to remove the back wheel.
Now that the back wheel and brake are off the scooter deck you can begin to apply the new grip tape. Here is how to do that. Start with gathering supplies.
Supplies Needed:
- Alcohol (to clean scooter deck)
- Scissors (to cut grip tape)
- Razorblade/utility knife
- Any screwdriver or Allen Wrench (for outlining grip tape)
- And of course the Grip tape of your choice
Don’t forget your new grip tape. Check out these choices below.


Your scooter deck is now stripped of its old grip tape and the rear wheel and brake are off. It is time to begin the process of putting on the new grip tape. Here are the 11 steps involved when applying grip tape to a scooter deck.
- After the old grip tape has been removed, the deck needs to be prepped.
- You do this by cleaning the deck with alcohol and a clean rag. This removes any dirt, oils, and glue residue. It ensures better adherence of the grip tape to the scooter deck.
- Cut grip tape about 1/2″ (1.27 cm) larger than the main base of your scooter deck.
- If you are using a large sheet made for skateboards, cutting the sheet in half short end to short end, and then cutting one half in half longways, should be a good size to start with.
- Lay the grip tape on a bare deck (all old grip tape should be removed) with the grip tape backing paper still on
- Position the grip tape on scooter deck, either by…
- Lining it up to butt against the front straight edge against the headtube shaft.
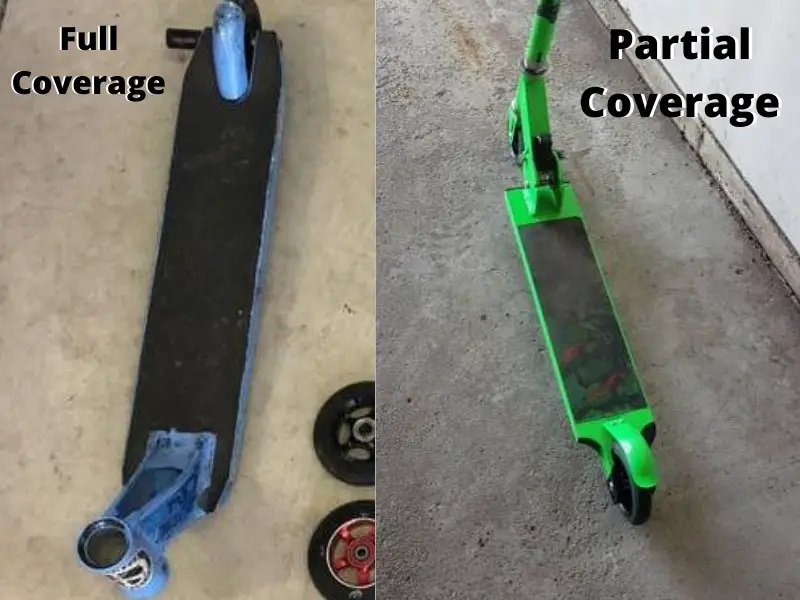
- Or past the headtube shaft to wrap around the headtube. It will temporarily bend up the headtube shaft until it is cut. So eyeball it to see how much will cover the two sides of the headtube, about 2″ for most should cover it.
- Either way is fine, it is a personal preference. But the more grip tape the better the gripping power.
- See Fig: 1 below the different grip tape coverage preferences.
- At this time, make sure the grip tape is long enough to reach beyond the rear wheel cut out. If it is a bit longer that is good, it should be about a 1/4″ (.635 cm) to 1/2″ (1.27 cm) longer. You will be cutting around the cutout.
- Peel back about an inch to three inches of the paper backing on the bottom of the grip tape and secure it to the front of the deck, if placing it around the headtube it will be adhering a couple of inches up the headtube at this time until it is trimmed.
- Make sure the grip tape is positioned properly and then press the tape at the front of the scooter deck down to adhere to the deck.
- Proceed to smooth out tape onto the deck and continue to pull the paper backing as you smooth out the grip tape firmly pressing it down on the deck and being careful as to not get air bubbles.
- When all the paper has been pulled off, press firmly on grip tape on all areas of the deck to make sure it is secured.
- Tip: If air bubbles appear, you can poke the bubbles with the razor blade and press them until they flatten.
- Trimming around the headtube, first cut down the center of the paper covering the headtube, being careful not to go below the weld.
- From that center, cut around each side of the headtube using a sharp razor above the weld. Press firmly onto grip tape to make sure it adheres securely.
- Now proceed to the back of the scooter deck and cut down the center opening of where the scooter brake goes. Then just before you get to the center of the opening, cut a “Y” into the paper. (This will enable you to form the paper around the curve easier.)
- Next step, take your Allen wrench, or a screwdriver or any metal bar tool. This will be used to run along the edge of the scooter deck on top of the grip tape. When you run the tool on the edge of the scooter deck it will create a clean line as a guide to cut along. Also, do this on the inside of the wheel cut out in the back of the deck.
- Using a sharp razor blade and cutting away from you, run the razor right along the scooter deck on the line you created. Follow it all around, including the wheel cut out.
- The last step, take a piece of the cut-off grip tape and run it along the edges of the scooter deck to sorta seal the grip tape down tighter on the deck.
There you have it, you have applied grip tape on your scooter deck just like a pro! Who knows you could maybe set up your own scooter shop at this rate! Now to let you in on the fast un-pro way. The shortcut way of applying grip tape on your scooter!
How Do You Put Grip Tape On A Scooter: The Short Cut Way
This is how you put grip tape on your scooter the super-fast way with just a screwdriver and a razor blade.
- You start with a scooter that already has the grip tape removed, then lay your grip tape down on your scooter deck, and cut it to size.
- Cut a straight line right behind the headtube and then another straight line right in front of the brake and wheel on the back of the scooter. See the green scooter in Fig: 1 for this example.
- Just do a quick wipe down of your scooter deck, to get loose dirt off, then apply your tape by…
- Pulling back the adhesive paper about an inch or so, lining up the grip tape on the scooter and then press the tape on as you pull the paper backing off.
- Next, take the screwdriver and run it along both of the edges of the grip tape on both sides of the deck.
- Now cut along the scoreline and Whah La! You’re done!
To give your scooter grip tape longer-lasting power, keeping it clean will do just that. Let me tell you now how you can preserve the life of your scooter grip tape.
How To Clean Grip Tape
- The first method involves scrubbing the deck with soap and water. Here is what you need.
- Water
- Liquid Soap
- Toothbrush (Old toothbrush that you no longer need or a new one that you will not use to brush your teeth)
- Clean dry towel or rag
- Rinse the scooter deck off with water to remove excess debris. You can do this with a hose, water bottle, or pitcher of water.
- Next, add a few drops of liquid soap to the scooter deck.
- With the toothbrush or some type of scrub brush, scrub the deck until you have covered the whole surface and it has soaped up. (Don’t do the scrubbing action to hard because you don’t want to scrub off the grit on the grip tape).
- Now you need to rinse the soap off, again using water. Rinse it off until soap is gone.
- The final step, dry with a dry clean towel and let air dry. You can speed the process up by using a hairdryer.
And that is it, nice and clean! Do this method when your tape gets really dirty, like if you were around a lot of dirt or mud.
Another method that is faster and can be done just about anywhere, like at the skate park and so on, is erasing the dirt off. Yes, you can erase dirt off your scooter grip tape with a giant eraser made for the job.
You can carry this around in your bag of scooter accessories to get unwanted dirt off your deck anytime. Check it out! Click on the image below to get more details.

Some Custom Grip Tape Ideas
There are many ways to customize your scooter to be your own and what better way than with custom grip tape. Here are a few ideas to do just that.
- Use multiply grip tape and cut angles and pieces to place on your deck for a unique grip tape design. Almost like a puzzle of shapes that you cut yourself. (I would limit it to just a few cuts, like half and half right angle or on a diagonal cut.)
- Another idea is if you are talented in drawing you could customize your scooter deck with your own artwork. There are special paint markers that will last a while on your grip tape. Or you could paint right on your scooter deck and cover it in clear grip tape.
- This idea is also a creative idea if you are any kind of artist or not. You can make a custom design computer-generated and a company will create your design and put it on the grip tape. How rad is that!? Here is a link to check it out, https://splattergoat.com/.